Wifi IP mpeg4 cam 54 mbps
WL-401 v1 001
Comment utiliser le portail et que puis-je faire avec ?
Ouvrez la page https://mycamera.sitecom.com pour utiliser le portail. Utilisez les navigateurs suivants : Firefox ou Internet Explorer. Ni Safari ni Google Chrome ne prennent en charge Java ; ils ne fonctionnent donc pas avec le portail MyCam.

Connectez-vous avec votre compte MyCam. Si vous n'avez pas encore de compte, créez-en un avec le bouton "Créer un compte". Une fois que vous avez ouvert une session, vous voyez la "Synthèse des caméras". Vous pouvez voir vos caméras actives :

À quoi servent les boutons suivants ?

 : Recharge le flux en direct.
 : Activation/désactivation du son
 : Ouvre la chronologie de la Wi-Fi Home Cam
 : Statut de la caméra (en ligne)
 : Statut de la caméra (occupée)
 : Statut de la caméra (hors ligne)
Dans la chronologie de la Wi-Fi Home Cam, vous pouvez revoir les événements par heure, par jour ou par semaine.
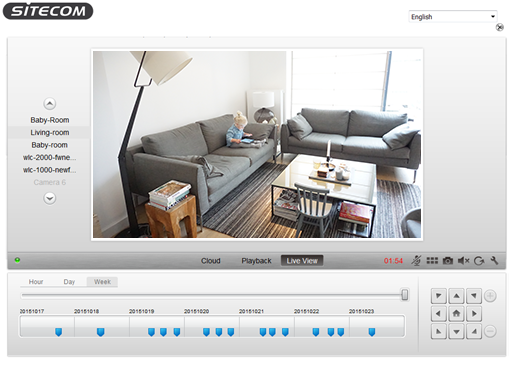
Passez la souris sur l'un des marqueurs bleus de la chronologie pour ouvrir une fenêtre pop-up contenant les événements qui ont eu lieu à ce moment-là.

Sélectionnez un des marqueurs temporels. L'enregistrement est alors lu à l'écran.
Les boutons de commande se trouvent dans le coin inférieur droit.

Pour modifier les détails du compte, cliquez sur "Compte" en haut de la page.

Vous êtes alors dans "Account overview" (Vue d'ensemble du compte). Si vous effectuez des modifications, cliquez sur le bouton  pour les enregistrer.

Vous pouvez aussi gérer vos périphériques au sein de votre compte. Pour cela, cliquez sur "Device" (Périphérique) dans le coin supérieur droit de l'écran. Ici, vous pouvez ajouter  , change
 or delete
 cameras.

Pour ajouter une caméra, cliquez sur  . Vous voyez alors l'écran suivant :
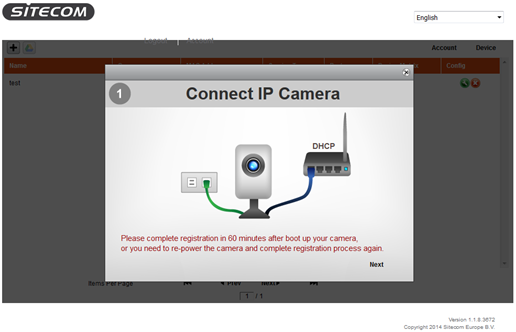
Important : l'image ne correspond pas à la réalité.
Ensuite, suivez les étapes jusqu'à ce que vous obteniez l'écran suivant.
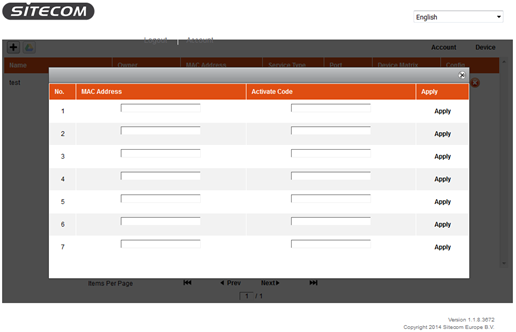
Saisissez votre adresse MAC et le code d'activation. Vous pouvez les trouver sur le dépliant livré avec la Wi-Fi Home Cam. Après la saisie, cliquez sur "Apply" (Appliquer).
Si cela fonctionne, le bouton "Apply" (Appliquer) change comme ceci :  .
.
Dans le cas contraire, il s'affiche le message suivant : 
Redémarrez la caméra en débranchant le câble d'alimentation. Rebranchez le câble pour remettre en marche l'équipement et vérifiez que la caméra est connectée à un réseau ! Cela est nécessaire pour activer la caméra. Pour plus d'informations sur ce problème, cliquez ici.
Pour personnaliser le nom ou la qualité vidéo, cliquez sur  . Vous voyez alors l'écran suivant :

Si vous avez modifié le nom ou la qualité vidéo, cliquez sur "Apply" (Appliquer). Vous voulez revenir aux paramètres par défaut ? Cliquez sur "Reset" (Réinitialiser). Vous pouvez aussi supprimer la caméra à partir de votre compte en cliquant sur le bouton "Supprimer".
Pour supprimer la caméra, cliquez sur  .
.
Vous obtenez le message ci-dessous. Cliquez sur OK pour supprimer la caméra ou sur "Annuler" si vous changez d'avis.
